Showing posts with label Work Diary. Show all posts

Thursday, 28 April 2016

Multiple Imagery Work Diary

For this shoot, I was set with the task of shooting the technique of multiple imagery. For this technique, I would have to create a range of images which could work together as a sequence of photographs. For this shoot, I wanted to develop a simple yet strong series of images which would combine together. I searched for inspiration within the technique and looked at photographers who's work could influence me to develop the technique in interesting ways. In my search I came across an image, however I could not find the name of the photographer. The image featured Jack Nicholson as the joker. There were four main frames and each contained a different facial expression. The effect itself was extremely straight forward however, in its simplicity the image appeared even more visually dynamic. As a result, I wanted to replicate this style of simple multiple imagery photography for my own work. The main thing to keep in mind while shooting multiple imagery is consistency. I had to make sure the camera stayed still between each image in order to achieve the effect which I wanted otherwise the editing process would be made more difficult and the images would not work as a series. I used a tripod in order to counteract this. I used a simple two light set up with soft boxes in order to light the subject adequately. For my camera settings I wanted to use a simple approach in order to ensure that the images appear detailed enough. I used a shutter speed of 1/125, an f stop of 11 and an ISO of 200. This would allow me to take detailed enough images in order to achieve the result I wanted.

Joker Influence:


My Image:

For this image I attempted to focus on simple yet strong images. In order to reflect this I focused on contrast as my main theme. Within the editing process, I created a new image with a transparent background. I then opened up each image and began to copy and past the image into the transparent image. I used the zoom tool in order to adjust each image so they aligned. Any image that was sized differently was cropped in order to fit better. The result created a cohesive set of images. I used levels in order to darken the black tones within the image. I then used a black and white filter and began to adjust colours independently from each other. The result appears in an almost silhouette format with different positioning as the image continues. Each image features contrasts which make the image appear visually striking in a simplistic manner. Much like the way the image that inspired this shoot did.

Progression:

If I were to develop this shoot, I would experiment with the use of different subjects. I could use people's faces or cars moving or different locations. I could utilise this technique within my subject by present a collection of images which work together under one theme in order to communicate a message to the audience more strongly.

Video Work Diary

For this shoot, I was set with the task of shooting the technique of video. For this technique, I was encouraged to capture an image within an image, except for this shoot I would have to use the still image as a frame for the video. For this shoot, I wanted to take a simple technique and present it in a unique way. For the direction in which I wanted to take the image I needed to use a tripod in order to ensure that there was no camera movement between taking the photograph and shooting the video.


This image features an interesting technique as I used a frame to hold the video. I used Premiere pro in order to adjust the size and composition of the video by manipulating the motion panel of the clip. While filming the video I wanted to make the video appear to end in the position of the surrounding image. In order to capture this, I had the person stand still as I took a picture and then remain in place. This would ensure the images match perfectly. As I began filming I had the person place the frame on the floor and walk out of the frame backwards. In premiere pro I reversed the video in order to make it appear as if she picks up the frame and ends in the same position as the surrounding image.

Progression:

If I were to develop this technique, I would use it within the subject of hyperreality. I could replicate the style of a film and show how dramatised the media's depiction of reality is.

High Key Work Diary

For this shoot, I was set with the task of shooting the technique of high key. For this technique, I would have to manipulate light and specific camera settings in a way that would compliment each other perfectly. The aim of the effect is to separate the background and the person by lighting them independently from eachotehr at different settings. The result should allow for the background to appear totally white. For this shoot, I wanted to develop a range of strong portrait images which use the effect to make interesting compositions. I searched for inspiration within the technique and looked at photographers who's work could influence me to develop the technique in interesting ways. In my search for inspiration I looked at photographers such as Michael Schimczik. A particular image of his stood out to me as it featured a cheetah on a tree against an endless white background. Instead of simply photographing the cheetah and filling the frame, he chose to compose the frame using the white background in order to highlight contrasts and draw attention to the subject. I knew that I could take this idea of interesting composition and use of contrasts and apply it to my own work. As this shoot would be heavily reliant on my camera settings and light set up I had to make sure these were perfectly set up. I used a total of three lights, one pointing at the individual with a soft box while the other two lit the background. Bounce boards were used in order to cast indirect light onto the background, lighting it evenly. The light readings for the background were at f11 while the subject was f16. This would ensure that the background would remain independent from the subject, creating an all white background effect. I used a shutter speed of 1/125, an f stop of 16 and an ISO of 200. These settings were crucial for the amount of light which I was dealing with. The f stop of 16 would allow a controlled amount of light to go into the lens in order to ensure that the image was not over exposed.

Michael Schimczik influence:


These two images experiment with the technique of high key. They feature different forms of composition which are used for different impacts. Like the Michael Schimczik image, I have attempted to use the white space in order to create contrasts and highlight the ways in which I could direct the audience's attention. I wanted to use contrast as a main theme within this shoot. In order to highlight this, I used the levels and curves in Photoshop as well as the brightness and contrast in order to make the people stand out boldly amongst the background. This technique could be applied to other editing techniques. The background is completely separate which would allow for easy editing to remove the person and place them in an entirely different image.

Progression:

Overall I feel that this shoot was successful. If I were to develop this shoot in any way I would maybe use different types of composition. I would perhaps use different angles of low and high. I would experiment with distance, using extreme close ups and long shots in order to add more variety to the image.

Multiple Flash Work Diary

For this shoot, I was set with the task of shooting the technique of Multiple Flash. The effect is similar to slow sync in some areas as both have the potential to capture a range of movement, however with multiple flash I have the ability to capture movement through crisp images that occur through a more prominent use of the flash. I wanted to find a way to develop interesting images that would vary considerably from each other. Due to the small area of the studio, this was a concern of mine so I made sure to implement the use of props and different ranges of movement within my images. In order to ensure that I achieved variation within my images, I began research. Upon my research, I found a photographer by the name of  Mads Perch whose work with multiple flash served as a massive influence. I noticed the way that the technique was used in order to create the sense of multiple people standing around. This gave me the idea to focus my shoot on people being featured multiple times within the same frame and how they can interact with each other. I also could easily link this technique to the subject of hyperreality as I am making an image appear exciting compared to anything in reality. As this shoot would be heavily reliant on my camera settings and light set up I had to make sure these were accurately set up. I used two lights with soft boxes which would set off a flash as the camera began taking pictures. I used a shutter speed of 8.0, an f stop of 11 and an ISO of 125. The most important thing for this technique would be to keep the shutter button held down for as long as I need to while spacing out the use of the flash in order to ensure that the image does not appear over exposed.

 Mads Perch influence:

:

My images:


This image was achieved by having the same person perform two different poses on opposite sides of the frame. One pose made the person appear that they were cowering within the corner of the frame while the other pose features someone holding a dish in their hands in a swinging motion. I spread the flashes long enough over the duration of the image in order to create a crisp image of the two poses which did not make the image too over exposed. The result gives the effect that the person is swinging to hit herself over the head. I adjusted levels and curves in order to darken aspects of the image. This gave each pose a more physical appearance instead of the ghostly original image. There is an element to this image which can be linked to hyperreality and the format of television. The image is presented within a very slapstick style that is reminiscent of black and white films. This idea is enforced through the creation of a vignette effect which was commonly used within these black and white films. This appearance could be used in other shoots in order to simulate a media, constructed world.


This image uses the same technique in order to create a new image. I had the person perform running poses in three different positions. This evokes a sense of movement within the frame presented in a frame by frame motion. However I also wanted to imply a sense of an endless loop. The vignette effect within the outer frame causes the person to fade into obscurity. This was done in order to create a portal effect where the body ends in the right of the frame and the rest of the body continues in the left of the frame. The use of contrasts are prominent within the image as they help to highlight the moment of the person from the left of the frame to the right. The use of levels and curves help to enhance these contrasts within the frame.

Progression:

I feel that I was able to achieve a successful and visually varied example of multiple flash. If I were to develop this shoot, I would implement sports photography in order to create striking movement photography. I would use skateboarding, running or dancing in order to document the range of movement that is undertaken by people in the sport. I could use the visual style of the image to explore a style of media that could work within the subject of hyperreality.


Slow sync Work Diary

For this shoot, I was set with the task of shooting the technique of slow sync. For this technique, I would have to use a combination of studio light and specific camera settings. The effect has the potential to capture a range of movement in an almost ghostly appearance. In past units, I have had experience with similar shoots with similar techniques. My older images would often appear to be limited by the small studio environment and limited technique. For this attempt I wanted to experiment with how this technique can be used to elevate an existing form of photography such as portraiture in order to create a more exciting effect. In my search for inspiration I looked at photographers such as Jeremy Hall whose work with slow sync had shown me how the technique can give new life to an image by highlighting movement. I knew that I could take the effect that Hall had used and develop it into the format in which I wanted to show my images. I could use the new colours and tones that can be found within movement to create a hypnotic frame, causing the image to appear more dynamic than standard portraiture would allow. I also could link this subject to my subject of hyperreality as I am taking normal things such as portraiture and movement and combining them through photo manipulation in order to create an entirely heightened experience. As this shoot would be heavily reliant on my camera settings and light set up I had to make sure these were accurately set up. I used two lights with soft boxes which would set off a flash as the camera began taking pictures. I used a shutter speed of 2.5, an f stop of 16 and an ISO of 200. A slow shutter speed would allow me to capture the range of movement that I wanted while the other settings would make sure that the image remained detailed within this process.

Jeremy Hall inspiration:


My images:


This image features a simple portrait of the back of a head. Typically, this type of portraiture would appear very dull in most cases. However, through the use of the technique, the image appears to be a lot more interesting. I used slight movements for the person I was photographing in order to create a glowing effect. The colours within the portrait appear much more vibrant and contrast greatly against the black background. I wanted to enhance the contrast so I used levels within photoshop to enhance the darker areas of the image. I also had someone walk through the background in order to create a ghostly streak within the background. This would also allow for more visual information to fill the empty areas of the frame. The result takes a simple portrait and makes it much more striking.


This image takes this theme of portraiture and explores a variation of it. Instead of focusing on contrast like the last image, this image focuses more on the use of colour within the frame through the use of movement. I had the person wave a cloth around in a swirl motion in order to create an effect similar to a tornado. The result would cause bright colours to be cast around the frame, filling the spaces that would usually remain empty. The result makes the frame appear vibrant and full of energy. The audience can also see a range of movement within the frame that can only be achieved through this effect.

Progression:

If I were to develop this shoot further, I would explore the use of different movements. I could implement different objects such as footballs in order to create some variation. I could also experiment with a similar technique within location shoots. This would open up more possibilities for what I could achieve within the subject, since I could implement things like cars and larger groups of people into my shoots in order to offer more variation. I could also develop this technique into the subject of hyperreality. I would focus on how the technique takes a standard format of portraiture and presents it in an entirely heightened way that is unlike anything in reality.


Monday, 25 April 2016

Shoot 11 Work Diary

For this shoot, I wanted to explore aspects of hyperreality which could be derived directly from the format of film. The world is exposed to a variety of representations of reality which can be altered due to the genre or tone of the piece of media that is being viewed. I wanted to highlight how far from reality these representations can be, yet the audience accepts it and occasionally confuses reality for this. In order to explore this, I wanted to treat an image the same way that a film would. I would present my images in a familiar format by making the image appear to be a screenshot from films of varying genres and alter colours and tones depending on genre and mood, comparing the differences from the original image. In order to create diversity within the shoot, I chose four films from four different genres in order to compare the differences in representation which can occur during this process. The films which I looked at included The Dark Knight (crime), 500 Days of Summer (Romance), Blade Runner (Sci-fi), and The Book of Eli (Action). I chose these genres as they contrast with each other greatly in the colours used. This could highlight how images can be used to manipulate audiences, altering reality in small ways which change the way that the audience perceives it. Since for this shoot I was photographing mainly landscape shots in varying conditions, I had to adjust my camera settings accordingly. For the two images below, I used a shutter speed of 1/250, an f stop of 9 and an ISO of 100. This would allow me to compensate for the sunny weather without having the image appear over exposed. I would also be able to capture detail in large landscape formats.

Influential Images:

Blade Runner


The Book of Eli


500 Days of Summer


The Dark Knight


My images:


This image is an attempt which takes influence from 500 Days of Summer. This does not appear to be an extremely altered version of our real it, however compared to the original image, the audience can see dramatic differences between the two. It becomes apparent that reality is much more dull compared to how it is represented within the media. Without becoming aware, the audience are being manipulated in order to view an image in a certain way. SInce this is supposed to be a romance reflection of reality, I have taken the colours within the image and increased the saturation. The bright colours of the image offer connotations to happiness which causes the audience to feel some of this emotion to the image. Contrast has also been increased within the image in order to highlight brighter tones compared to the darker tones. The result of this causes makes it apparent that the media can easily manipulate the audience through the use of photo manipulation.
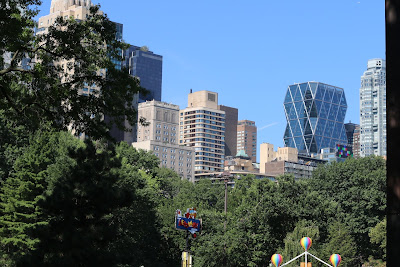
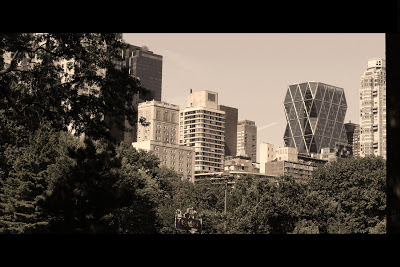

This image takes influence from The Book of Eli and its post apocolyptic representation of reality. It is apparent within the original image that the image is just an ordinary, relatively colourful representation of reality. However, when Photoshop is introduced the image takes on new meaning filled with vastly different connotations. The aim for the image is to make audiences feel glum. The colour grade, focusing on brown tones causes the image to appear dry, which gives the impression that the area is deserted. The sky has been changed from blue to a single tone of grey/brown, implying that the world is very depressing. This contrast is tone is used to show the impact that the media can have on the representation of the world, causing certain emotions to be felt while manipulating audiences.
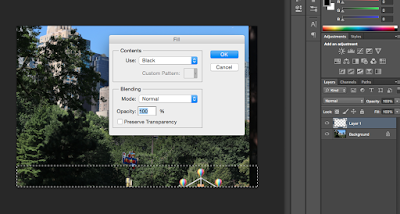
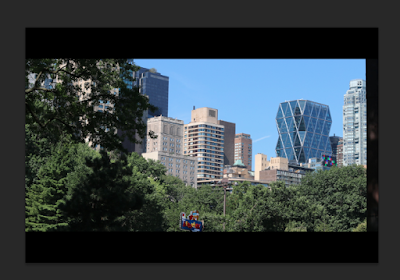

I used similar techniques within all of the images within the shoot. The first step was to add the aspect ratio through the use of black bars to create a more dramatised composition. This would create the effect of a screenshot within a film format.


The next phase of editing would now focus on the colour grade of the image. In order to give the impression of a desolate location which would contrast greatly from the brightly coloured original image. I began adjusting the saturation within the image and began lowering it in order to make the frame seem more empty and dried out through muted colours. I then began to add a photo filter. In order to reflect The Book of Eli colour pallet, through the use of dark brown tones. This gives a sense that the world is almost dying/rotting away. I added levels and curves in order to add some brightness to the image in order to give tones of the image a more faded look while darkening other tones.


Progression:

If I were to develop this shoot further, I would implement people within the shoot and experiment with different styles. For example I might use a film such as Mad Max: Fury Road as inspiration as they used high contrast around the eyes of characters in order to reflect their mental state. I would also use lighting and manipulate existing light within the shoots in order to five the impression of film lighting. THis may highlight how different people may appear when altered within the media.

Tuesday, 19 April 2016

Shoot 10 Work Diary

For this shoot, I wanted to push my skills within a studio environment in order to display some strong portraiture. I got inspiration for a shoot when I saw a piece of art from, graffiti artist, Banksy. The image featured a couple who are holding each other, however their attention is diverted by their phone screens. I thought this was extremely powerful and I knew that I could use some methods within the studio through lighting in order to create a similar effect. I wanted to think about composition in order to communicate an idea of how everyone is so immersed within a media world and how everyone may be present in body but not in mind as they diverge into social media. It is a massive subject that is often debated. Its relevance, especially as technology has greatly advanced and the world has socially grown smaller. I wanted to focus on contrast as a key theme in order to make the image more visually striking as well as to make the message abundantly clearer. I also wanted to add some other themes that I have explored through hyperreality by changing the intensity and tone of the light in order to replicate the Banksy art style and to make the image/contrast more dramatic. To achieve the effect that I wanted to use, I had a two light set up. One light had a soft box while the other light which would flash had a snoot. This would allow a small/softer light to be projected onto the face of the person in order to simulate a dramatised version of the light from a phone. I used a black background in order to create a sense of emptiness within the frame. I used a shutter speed of 250, and an ISO of 200. This would allow me to achieve a brightness which wouldn't cause the face/background to appear too overexposed while not causing the image to be too dark as I lose detail within the image to darkness.

Example from Banksy:


This image features a person taking a selfie. It is a common term which immediately offers connotations to the digital age and social media. It implies a sense of vanity/self obsession which causes people to build up a relationship with a digital world. The person within the image is smiling which contrasts with the dark tone of the image. This is used to imply that the person is happy within her social media life but in reality her life is extremely empty, as is represented with the use of black in the frame. I have enhanced this sense of emptiness through the use of composition by ensuring a large portion of the image to be engulfed in darkness.


Initially, the image, while dark did not reflect the extremely dramatised glare effect from the phone that I wanted. To start, I applied the pale blue light effect to the image through the use of the photo filter. In order to give the sense that the light was coming straight from the phone, I removed the blue tint through the use of the brush tool and began removing areas that were out of reach of the phone's light.


I wanted to pull the shadows from around the face into the centre of the image, to give the impression that the darkness is engulfing the person. I wanted to exaggerate this more and in order to exaggerate the fact that the only light within the frame was coming from the phone. I used a black brush with a hardness of 54% in order to create shadows around the light of the phone. I used this technique for all of the images within the shoot, however I liked the pose of the person within the frame on this image however I believed that the image would be composed better if the subject was more central. I took the lasso tool and looped it around the area that I wished to change. I copied and pasted the selection, then proceeded to paint the background black in order to remove the old position. I feel this composition works much better.


This image promotes the same method and visual style. This image features a much more personal, central composition which uses low light within an extremely dark background. The expression and posture of the person resembles someone who is reading a text. This is a common sight, however the use of light and contrast implies that the phone is the only bit of light in her life, as everything around her fades into obscurity. The composition reflects this as there is a great amount of darkness in the remainder of the frame.

Progression:

Sunday, 10 April 2016

Blurring Work Diary

For this shoot, I was set with the task of shooting the technique of Blurring. For this technique, I would have to use a combination of studio light and camera settings. The effect has the potential to capture a range of movement which can introduce new tones and colours to the image. Since I was restricted to the small area of the studio as I wanted to achieve specific effects that would be centred around movement on a small scale. For this shoot I looked at existing practitioners of the blurring technique. Within my research, I found a photographer named David Galstyan whose work with blurring served as a massive influence for me. One of his images used blurring in a way that helped evoke emotion within the format of a portrait. The image was stunning and the tones featured within the image helped create a portrait which is unlike anything outside of the subject of blurring. I could take this idea of portraiture which has been enhanced through the use of blurring and apply it to my own work by focusing my images within a portrait format. I could use the new colours and tones that can be found within movement to create a pattern across the frame to fill the empty space, causing the image to appear more exciting than standard portraiture. I could link this technique to my subject of hyperreality as I am taking normal things such as movement and giving the audience a new experience which cannot be found naturally. As this shoot would be heavily reliant on my camera settings and light set up I had to make sure these were accurately set up. I used two lights with soft boxes which would set off a flash as the camera began taking pictures. I used a shutter speed of 2.5, an f stop of 16 and an ISO of 200. I would need to capture the range of movement before the shutter shuts again.


This image represents a simple range of movement and how it can be documented. The glow of the skin colour against the dark background creates a contrast which causes the range of movement to become more evident for the audience. We can see the bounce of each step as they make their way from the left of the frame to the right. The boldness of the colour within the frame allows for more information to be given to the audience as they can judge roughly how fast the person was moving within the frame as the colour fades as she moves faster.


This image uses an in camera zoom in order to reflect a different form of blurring. This quick, blurring motion can be used in order to create an interesting, varied result which can take place within portraiture. This can be used to add more detail within the frame, focusing on close ups and the body in order to show the audience more of the person that is being photographed. This method can also be used to imply a sense of speed as the range of motion implies that the person has quickly moved from the background to the foreground.

Progression:

I was able to achieve a good variation of images which could be applied to a number of different subjects such as movement and portraiture in interesting ways. If I were to do this shoot again, I would experiment with the technique outside. I could experiment on a vaster scale and implement cars and more open areas such as a field and also experiment with some of the different forms of light in that can be seen in location portraiture from headlights to streetlamps.

Sunday, 21 February 2016

Shoot 9 Work Diary

For this shoot I wanted to continue my work in the more visual and stylistic aspects of hyperreality as a subject instead of metaphorical. This work into hyperreality is directly inspired by the photographer Cedric Delsaux and his work into Star Wars related photography. I have attempted to replicate this through the same use of miniatures and have decided to blend them into real world environments. An image from Delsaux which acted as a major influence was one which features an AT-AT from Star Wars. The most notable thing about this image was the fact that the AT-AT contrasted so heavily with the environment that it highlighted how dull the real world is compared to the fantasy world of star wars. The image was presented through gritty, realistic colours that appear almost muted. This influenced me as I could directly link these themes to the subject of hyperreality and the way that the heightened world of the media contrasts with our reality. Also I wanted to develop this idea and explore how reality and hyperreality can be blurred together through this technique and how ideas of hyperealities can affect the way we perceive the real world. I was going to achieve this shoot by using a combination of landscape photography and small-scale miniature photography. The landscape shoots would vary, however it was the miniatures that would be the key to making the effect convincing. I adjusted my camera settings in order to match the settings required to take a detailed image on a small-scale. I was taking these miniatures with low light so I compensated by using a shutter speed of 1/20, an f stop of 16 and an ISO of 600. This would allow me to achieve the required detail within the image on a small scale.

Cedric Delsaux influence:


My images:


This image features a busy area within New York. I have purposely chosen this heavily advertised area as advertisement plays such a heavy role within the subject of hyperreality. I have chosen to add a toy of the bat mobile in order to enhance the image. I have given the model more authenticity by matching the lighting and adding the flame within the exhaust. I to use a toy as it draws connotations to imagination which blends seamlessly into the real world, making it difficult to distinguish between the two.


This image features a more realistic attempt at the method by placing a model of a plane within the image. I adjusted the lighting within the image in order to more accurately depict what a figure in the sky would look like. The smoke trail implies that the plane is broken but at the same time it provides scale and a sense of believability to the audience. The black and white tones were used in order to create contrasts within the skyline, highlighting what I wanted audiences to see.


To begin, I used the quick selection tool in order to highlight the model. I then copied and pasted the image onto the background which I wanted to use. In order to match the gritty tones that can be seen within the work of Cedric Delsaux, I used a black and white filter once I had framed the object correctly.


I then adjusted aspects of the black and white filter. I wanted to create darker tones within the image in order to offer connotations of dullness. I also wanted to make the sky darker in order to believably contrast the model from the sky. I then made the object darker through the use of brightness and contrast. Once this was completed I slightly dropped the opacity of the object to 76% in order to blend the two images together better. I then used a brush tool to simulate the effect of a trail of smoke leaving the plane.


Progression:

This shoot worked out well and I was able to accurately replicate the types of photographs that Cedric Delsaux has taken. However, the success of the shoot has made me curious about where else I could have taken the technique. If I were to do the shoot again I would like to experiment by using people within the image and changing their size. I would also like to have experimented with different weather types such as fog in order to blend the images just as Delsaux had previously done.

Shoot 8 Work Diary

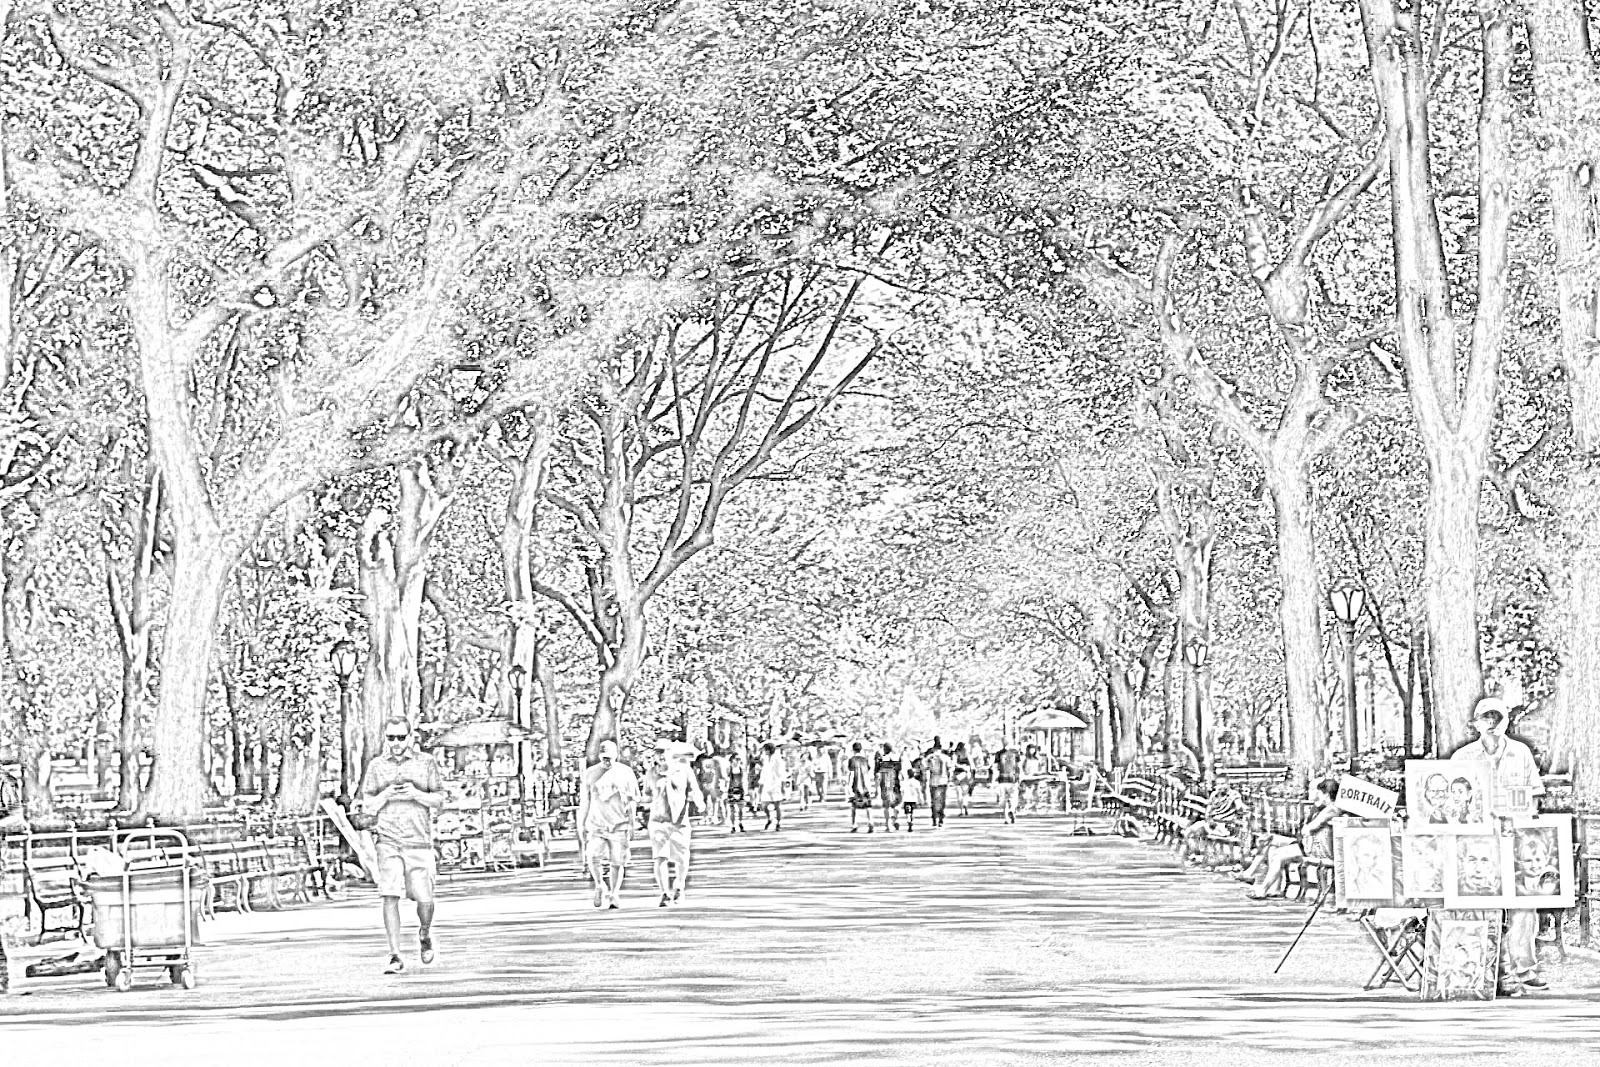
For this shoot I wanted to experiment with photographic realities by enhancing them in new and unique ways. Instead of focusing on how the public commonly fall victim to deception from the media, I instead wanted to focus on a more stylised approach, highlighting how our reality can be enhanced greatly and made more exciting as a result. I thought about different ways in which I could achieve this effect but then I thought of how drawing can inspire connotations to creativity and fictitious worlds that have been constructed. A massive inspiration for this shoot was Helmut Jacoby's work based on Milton Keynes, particularly one image which focuses on a busy landscape. Despite being a fairly standard setting, the sketched format causes the image to appear more exciting, causing the audience to view a familiar setting in a different way. This gave me the visual premise for the style of the image as it could be translated directly into the subject of hyperreality by showing a standard setting in a more visually interesting way than can be seen in reality.

Helmut Jacoby influence:


My images:


This image of what may be considered bland and a part of everyday life is transformed into something more. Because people are used to seeing sights like this, a lot of information within the image is lost, however with the added effect of the drawing style, small details start to become more prominent. Patterns can be seen throughout the image within buildings which give the image a more stylised appearance. Detail within the image can be seen even within the distance which would have been lost within the original image.


For this effect I first made sure to create a copy of the background layer. I then added a black and white filter. I then used the copy of the background layer and switched the blend mode to colour dodge. When this is done I inverted the layer by clicking cmd I. This causes the image to appear completely white apart from the very dark tones.


Once this step was completed I could now focus on blurring the darker tones in order to create the effect. I created a smart object on the copy layer in order to allow me to go back and adjust the effect any time I wanted. I went to filter-blur-gaussian blur and began adjusting the effect. I chose to keep the pixel radius at around 24.7 in order to create a convincing art-style effect.


This image offers a more chaotic variation using the same technique. The image consists of a collection of trees within a park. As a result of the effect, an endless pattern is created which may have been lost without the added contrast of the black and white tones. More information can be given within the image as a result of the effect. The lines on the ground give the audience information to factors such as the seemingly uneven texture, through the use of lines.

Progress:

This shoot has introduced me to a new and visually striking idea and I have managed to use this within varying environments. As a result I would potentially like to continue my investigation into the stylistic side of the hyperreality subject. I could look into other photoshop techniques in order to make images appear more unbelievable. If I were to develop this shoot, I would perhaps introduce colour in order to further create a more heightened/exciting version of reality. 

Animation Work Diary


For this shoot we were set with the task of completing an animation. For this I wanted to experiment with two different methods of showing this technique. To achieve the basic requirements of this technique I needed to take a series of photographs which could all seamlessly blend within one another. For this I needed to bring a tripod to shoot with in order to ensure an easier editing process within Photoshop.


This image shows a rather simple variation on animation. For this image I wanted to explore two vast contrasts and blend them within the same animation. For the contrast, I used vivid, oversaturated colours and turned them into a desaturated, black and white image. This image relied heavily on the use of Photoshop in order to achieve the vastly different colours. The effect allows the audience to slowly break down each phase of the image. First they can see the vivid colours that then begin to fade into the original image, the final result gradually reduces the colour within the image. This effect can cause connotations to be made between happiness transitioning to sadness.


This animation shows progression from the last as it attempts a more complex technique. This was accomplished using a tripod with the camera in order to take a series of photographs. Each image is made to transition into each other in a way that creates a sense of motion. I had purposely chosen the park ride in an effort to blend the end of the series of images. This results in a seemingly endless loop of movement within the image.

Progress:

The techniques worked well within their intended purpose, however I would like to have experimented more with more complex examples of the technique as I now have more of a grasp on the method. I could potentially make small film-like stories that would play out over the course of a few seconds.