Thursday, 28 April 2016

Multiple Flash Work Diary

For this shoot, I was set with the task of shooting the technique of Multiple Flash. The effect is similar to slow sync in some areas as both have the potential to capture a range of movement, however with multiple flash I have the ability to capture movement through crisp images that occur through a more prominent use of the flash. I wanted to find a way to develop interesting images that would vary considerably from each other. Due to the small area of the studio, this was a concern of mine so I made sure to implement the use of props and different ranges of movement within my images. In order to ensure that I achieved variation within my images, I began research. Upon my research, I found a photographer by the name of  Mads Perch whose work with multiple flash served as a massive influence. I noticed the way that the technique was used in order to create the sense of multiple people standing around. This gave me the idea to focus my shoot on people being featured multiple times within the same frame and how they can interact with each other. I also could easily link this technique to the subject of hyperreality as I am making an image appear exciting compared to anything in reality. As this shoot would be heavily reliant on my camera settings and light set up I had to make sure these were accurately set up. I used two lights with soft boxes which would set off a flash as the camera began taking pictures. I used a shutter speed of 8.0, an f stop of 11 and an ISO of 125. The most important thing for this technique would be to keep the shutter button held down for as long as I need to while spacing out the use of the flash in order to ensure that the image does not appear over exposed.

 Mads Perch influence:

:

My images:


This image was achieved by having the same person perform two different poses on opposite sides of the frame. One pose made the person appear that they were cowering within the corner of the frame while the other pose features someone holding a dish in their hands in a swinging motion. I spread the flashes long enough over the duration of the image in order to create a crisp image of the two poses which did not make the image too over exposed. The result gives the effect that the person is swinging to hit herself over the head. I adjusted levels and curves in order to darken aspects of the image. This gave each pose a more physical appearance instead of the ghostly original image. There is an element to this image which can be linked to hyperreality and the format of television. The image is presented within a very slapstick style that is reminiscent of black and white films. This idea is enforced through the creation of a vignette effect which was commonly used within these black and white films. This appearance could be used in other shoots in order to simulate a media, constructed world.


This image uses the same technique in order to create a new image. I had the person perform running poses in three different positions. This evokes a sense of movement within the frame presented in a frame by frame motion. However I also wanted to imply a sense of an endless loop. The vignette effect within the outer frame causes the person to fade into obscurity. This was done in order to create a portal effect where the body ends in the right of the frame and the rest of the body continues in the left of the frame. The use of contrasts are prominent within the image as they help to highlight the moment of the person from the left of the frame to the right. The use of levels and curves help to enhance these contrasts within the frame.

Progression:

I feel that I was able to achieve a successful and visually varied example of multiple flash. If I were to develop this shoot, I would implement sports photography in order to create striking movement photography. I would use skateboarding, running or dancing in order to document the range of movement that is undertaken by people in the sport. I could use the visual style of the image to explore a style of media that could work within the subject of hyperreality.


Slow sync Work Diary

For this shoot, I was set with the task of shooting the technique of slow sync. For this technique, I would have to use a combination of studio light and specific camera settings. The effect has the potential to capture a range of movement in an almost ghostly appearance. In past units, I have had experience with similar shoots with similar techniques. My older images would often appear to be limited by the small studio environment and limited technique. For this attempt I wanted to experiment with how this technique can be used to elevate an existing form of photography such as portraiture in order to create a more exciting effect. In my search for inspiration I looked at photographers such as Jeremy Hall whose work with slow sync had shown me how the technique can give new life to an image by highlighting movement. I knew that I could take the effect that Hall had used and develop it into the format in which I wanted to show my images. I could use the new colours and tones that can be found within movement to create a hypnotic frame, causing the image to appear more dynamic than standard portraiture would allow. I also could link this subject to my subject of hyperreality as I am taking normal things such as portraiture and movement and combining them through photo manipulation in order to create an entirely heightened experience. As this shoot would be heavily reliant on my camera settings and light set up I had to make sure these were accurately set up. I used two lights with soft boxes which would set off a flash as the camera began taking pictures. I used a shutter speed of 2.5, an f stop of 16 and an ISO of 200. A slow shutter speed would allow me to capture the range of movement that I wanted while the other settings would make sure that the image remained detailed within this process.

Jeremy Hall inspiration:


My images:


This image features a simple portrait of the back of a head. Typically, this type of portraiture would appear very dull in most cases. However, through the use of the technique, the image appears to be a lot more interesting. I used slight movements for the person I was photographing in order to create a glowing effect. The colours within the portrait appear much more vibrant and contrast greatly against the black background. I wanted to enhance the contrast so I used levels within photoshop to enhance the darker areas of the image. I also had someone walk through the background in order to create a ghostly streak within the background. This would also allow for more visual information to fill the empty areas of the frame. The result takes a simple portrait and makes it much more striking.


This image takes this theme of portraiture and explores a variation of it. Instead of focusing on contrast like the last image, this image focuses more on the use of colour within the frame through the use of movement. I had the person wave a cloth around in a swirl motion in order to create an effect similar to a tornado. The result would cause bright colours to be cast around the frame, filling the spaces that would usually remain empty. The result makes the frame appear vibrant and full of energy. The audience can also see a range of movement within the frame that can only be achieved through this effect.

Progression:

If I were to develop this shoot further, I would explore the use of different movements. I could implement different objects such as footballs in order to create some variation. I could also experiment with a similar technique within location shoots. This would open up more possibilities for what I could achieve within the subject, since I could implement things like cars and larger groups of people into my shoots in order to offer more variation. I could also develop this technique into the subject of hyperreality. I would focus on how the technique takes a standard format of portraiture and presents it in an entirely heightened way that is unlike anything in reality.


Wednesday, 27 April 2016

Final Project Evaluation

As I started unit 3, I had a rough idea of where I would like to take my subject of hyperreality. I began researching the key issues, controversies and themes which would help me to develop and create strong work. However, upon reflection it appears that I did not give myself the opportunity to begin commenting on some of the more controversial and weighted issues of the subject until later into the year. My images began strong, I had ambitions of exploring the ways in which Photoshop can be used in order to make the real world more exciting. However, I personally think some of my best work this year lies within my later, more challenging shoots. I focused largely on contrasts between the real world and a fictional world which was created within the media. I would use colour in order to explore these subjects, saturation would be increased in order to represent the over mediated reality of the media while the reality would be represented within black and white/muted colours of the real world. I began to notice that this idea was beginning to get repetitive, so I looked to develop my work through research into Photoshop techniques and possible connotations which could help improve the quality of my work and link to hyperreality.

I began to use different techniques such as portraiture in order to explore heavy themes such as body image. I contrasted the ways in which the media can create a more attractive person with the original image. The result looks absurd to think that the audience could believe that this was an accurate representation of a person. The purpose of the image was to make people realise the extent which the media can manipulate a person's image, and to forget about these unrealistic body images. I immediately noticed an improvement in the direction of my work due to the focus of a more layered subject within hyperreality through visually interesting Photoshop techniques. I also decided that a good way to keep my shoots visually dynamic from each other would be to use my research into other photographers of the subject and use their work as influences to my own. I began using photographers and artists such as Cedric Delsaux, Banksy, and Andre de Frietas in order to propel the quality of my work even further forward. Artists such as Banksy allowed me to develop techniques from images that could communicate to the subject of hyperreality through themes of manipulation and disconnecting socially in order to create some of my strongest pieces of photography to date. I also began to consider my body of work as a whole and looked to address key issues and weak points with it. The most significant example of this includes shoot 4 which originally for me seemed like my worst shoot. It appeared simplistic and too reminiscent of my previous shoots. As a result I used inspiration from a photographer named Alastair Magnaldo and began to change my work in favour of a more challenging, dynamic visual style which held more greater metaphorical meaning to the image of how reality is constructed by the media. This has now become one of my strongest shoots of the year.

Overall, I feel that I started the subject off with key ideas of where to take my work. However, it has become clear over time that these ideas needed to be more realised. It was after my first four shoots that I truly began to increase my ambition for the subject and sought to develop my work through visually interesting and metaphorically meaningful methods and representations. Using influences from artists and photographers whom I had previously researched allowed me to create stunning images which utilised more daring methods, testing my Photoshop and camera operating abilities. It also gave me the opportunity to create some of my more visually different pieces of Photography. I was able to explore all of the relevant aspects of hyperreality that I wanted to at the beginning of the year without making ideas seem repetitive or dull.

Monday, 25 April 2016

Top 40


Shoot 11 Work Diary

For this shoot, I wanted to explore aspects of hyperreality which could be derived directly from the format of film. The world is exposed to a variety of representations of reality which can be altered due to the genre or tone of the piece of media that is being viewed. I wanted to highlight how far from reality these representations can be, yet the audience accepts it and occasionally confuses reality for this. In order to explore this, I wanted to treat an image the same way that a film would. I would present my images in a familiar format by making the image appear to be a screenshot from films of varying genres and alter colours and tones depending on genre and mood, comparing the differences from the original image. In order to create diversity within the shoot, I chose four films from four different genres in order to compare the differences in representation which can occur during this process. The films which I looked at included The Dark Knight (crime), 500 Days of Summer (Romance), Blade Runner (Sci-fi), and The Book of Eli (Action). I chose these genres as they contrast with each other greatly in the colours used. This could highlight how images can be used to manipulate audiences, altering reality in small ways which change the way that the audience perceives it. Since for this shoot I was photographing mainly landscape shots in varying conditions, I had to adjust my camera settings accordingly. For the two images below, I used a shutter speed of 1/250, an f stop of 9 and an ISO of 100. This would allow me to compensate for the sunny weather without having the image appear over exposed. I would also be able to capture detail in large landscape formats.

Influential Images:

Blade Runner


The Book of Eli


500 Days of Summer


The Dark Knight


My images:


This image is an attempt which takes influence from 500 Days of Summer. This does not appear to be an extremely altered version of our real it, however compared to the original image, the audience can see dramatic differences between the two. It becomes apparent that reality is much more dull compared to how it is represented within the media. Without becoming aware, the audience are being manipulated in order to view an image in a certain way. SInce this is supposed to be a romance reflection of reality, I have taken the colours within the image and increased the saturation. The bright colours of the image offer connotations to happiness which causes the audience to feel some of this emotion to the image. Contrast has also been increased within the image in order to highlight brighter tones compared to the darker tones. The result of this causes makes it apparent that the media can easily manipulate the audience through the use of photo manipulation.


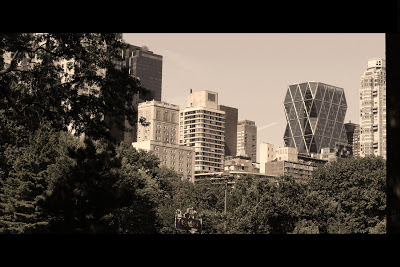
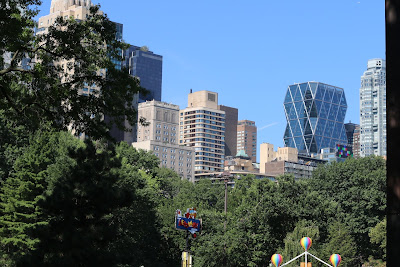
This image takes influence from The Book of Eli and its post apocolyptic representation of reality. It is apparent within the original image that the image is just an ordinary, relatively colourful representation of reality. However, when Photoshop is introduced the image takes on new meaning filled with vastly different connotations. The aim for the image is to make audiences feel glum. The colour grade, focusing on brown tones causes the image to appear dry, which gives the impression that the area is deserted. The sky has been changed from blue to a single tone of grey/brown, implying that the world is very depressing. This contrast is tone is used to show the impact that the media can have on the representation of the world, causing certain emotions to be felt while manipulating audiences.


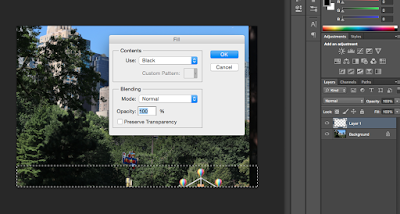
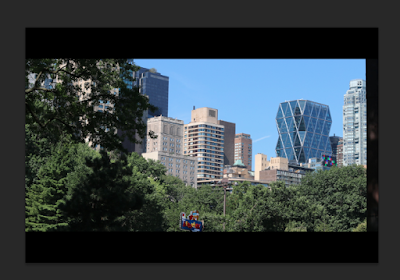
I used similar techniques within all of the images within the shoot. The first step was to add the aspect ratio through the use of black bars to create a more dramatised composition. This would create the effect of a screenshot within a film format.


The next phase of editing would now focus on the colour grade of the image. In order to give the impression of a desolate location which would contrast greatly from the brightly coloured original image. I began adjusting the saturation within the image and began lowering it in order to make the frame seem more empty and dried out through muted colours. I then began to add a photo filter. In order to reflect The Book of Eli colour pallet, through the use of dark brown tones. This gives a sense that the world is almost dying/rotting away. I added levels and curves in order to add some brightness to the image in order to give tones of the image a more faded look while darkening other tones.


Progression:

If I were to develop this shoot further, I would implement people within the shoot and experiment with different styles. For example I might use a film such as Mad Max: Fury Road as inspiration as they used high contrast around the eyes of characters in order to reflect their mental state. I would also use lighting and manipulate existing light within the shoots in order to five the impression of film lighting. THis may highlight how different people may appear when altered within the media.